Just some new knobs and totes
October 18, 2012 Leave a comment
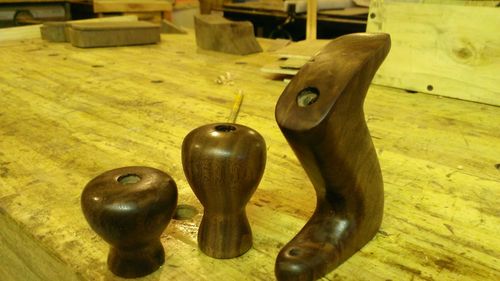
A new set of bloodwood knob and tote for a #2. Shown on one of my my #2s


A set of Walnut.


Tools and Woodworking for fun
October 18, 2012 Leave a comment
A new set of bloodwood knob and tote for a #2. Shown on one of my my #2s
A set of Walnut.
September 10, 2012 1 Comment
I was asked to write up how I turn my hand plane knobs. I want to be right up front with a few facts. I’m the farthest thing from a turning expert as you can get. I will admit I’ve bought a couple book, and I fully intend to read them some day, just right now, its look at it and do what I think makes sense.
Advice from “real” turners is more than welcome.
So first I’ll show how serous I am. I made a little tool box to hold the stuff I need to make knobs and totes. (here is the tote blog) If its used to refinish or manufacture a knob or a tote, its probably in this box or the ones next to it.


Next I’ll show the templates. These are just 1/4” luan cut to the desired profile.


Next thing you’ll need is some calipers. I typically use 2 for knobs, one for the widest part, one for the narrowest part and one for the base.


Next, cut the piece of wood. You’ll want it just a little longer. You can make it long enough to make more than one knob if you need. Cut it square the size you want. It needs to be just a little bigger than the total width of the knob. I like to make it a little bigger, than I don’t have to be so fussy getting my center perfect.

Next mark center.


I then drill a small hole completely through the piece. This will become center. Drilling from both ends helps keep center straight, but if your piece is big enough, its not extremely important at this point.
Now just mount in the lathe. My lathe is just an old craftsman. Someday I’ll upgrade, but so far this has done what I need it to. I really need some better cutters, but again, they work, so its not moved high enough on my priority list.

Now turn the piece down to the widest point. I leave it just a little big to allow for sanding.

Use a pencil to mark out the primary points.

Then start shaping.

Check occasionally against the profile template.

Once the shape has formed, I sand it. I sand all I can right down to 500 grit.

This is actually backwards from what I typically do. The drive center is typically at the bottom of the knob, or I turn the knob from the center of the blank. Now I’ll have the marks from the drive center to deal with, but they will sand out easily.
I don’t seem to have the cutter to allow me to cut the piece to length right on the lath, so I always use the band saw.

Now its off to the drill press. Re-drill the center hole with a 1/4” bit. (note some are actually smaller, so check the knob you’re reproducing)

Next drill for the nut countersink. A typically vintage Stanley is 7/16” but I’ve seen a lot with several other sizes. They are also different depths, so I use the actual nut as a guide. Drill and check. Drill and check.
I’ve tried several kinds of drill bits for this. The spade bit seems to work the best for me. If your going to use something else, you may want to do this step before drilling the center hole.
You can also use a stop or marker for the depth. I have a spade bit that I files a notch in, but there are so many different depths, the stop would need to be adjustable.


Until its just below the surface.

Now for the bottom receiver countersink. These are usually bigger. And there are a lot of different sizes.


Same as the top, I drill and check to get it right. I’ve also used a stop one the drills.
Next I sanded out the marks from the live center. I’ve done this several times in the past, always swearing I’d make sure the live center is one the bottom. I still sometimes forget. Either way there will be some sanding on the top.

Next I grab a special bolt I have for spinning the knob in the drill press. Its jut a 1/4”x20 bolt, but the head has been ground down enough to fit into the countersink.


Chuck it up, set the drill press on warp speed and generate some heat.

Take it out once in a while to have a look see.

Again, I sand down to 500 grit.

The reach for the wax/turpentine mixture and some steel wool.

If I didn’t have the camera in my hand, you’d see my other hand on the knob as well, generating friction to help heat the wood to help soak up the wax.

Next a rag soaked with BLO.

And we’re complete.

August 28, 2012 Leave a comment
I made these from a piece of Maple for a customer. They are made from Pacific Northwest Big Leaf Maple, with a quilted figure. The wood is furry sometimes and other times it hard as a rock.
Its like working with cherry that grows hair. Burns like cherry, cuts like weeping willow(maybe green weeping willow). And its like eating spaghetti with a white shirt on. Its the first time I’ve had to wash my hands to go to the shop.


Here they are on one of my #5’s


Thanks for looking
dw
July 15, 2012 Leave a comment
Moved to http://www.timetestedtools.net/2016/01/28/checkering-a-plane-tote/
So after posting this http://lumberjocks.com/donwilwol/blog/30812 I had some request to show better detail on checkering. It had been a while since I checkered, but I have several firearms I did several years ago. This is just a few.


June 22, 2012 Leave a comment
I bought a Handyman #3 (or so I thought it was a handyman #3) for $3.75 off eBay. I started stripping it today and as it unfolded I became a bit confused. Having never had a Handyman before, it took a while to sink it. I have what appears to be a type 5 – #3 with a handyman cap and a type 10 or 11 v shaped logo iron. SWEET.


Some past knob and tote creations.


Or how about a set of Cherry totes for a #5


How about Some Maple


June 15, 2012 1 Comment
Made from Cherry. It won’t replace the rosewood on this plane, but another just like it.


